So, how to use a telescope? Suppose you’ve recently received your debut telescope as either a present (or simply as a small surprise to yourself). In that case, you’re probably wondering, “How do I use a telescope?” ‘How do I set up a telescope?’ or ‘How do I set up?’
Don’t be concerned! You’ve arrived at the correct location. We have all the answers to your question! You can call this guide a first-time telescope user’s guide.
One of the most probable causes telescopes end up in a dingy basement or loft is that hardly anyone guides you on how to extract the most pleasure from your new telescope.
So, without any further ado, let’s dive right into it.
What Are The Parts of a Telescope?
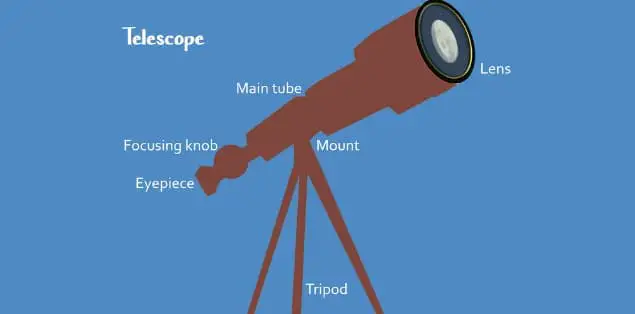
Lenses
One of the most crucial components of a telescope is the lens. The objective and eyepiece lenses are the two lenses found in most refracting telescopes. An objective lens is the larger of the two lenses, while an eyepiece lens is the smaller. The eyepiece lenses are concave in shape, while the lens is convex.
The eyepiece lens is on the front side of a telescope to concentrate on the image. In contrast, the objective lens is on the backside for magnification.
Mirror
We can find two mirrors in almost all telescopes. For example, the shape of the mirror might be planar, parabolic, or hyperbolic, depending on the design considerations.
The basic and secondary mirrors are the two types of mirrors. The original curved mirror serves as an objective. Manufacturers position the secondary bent mirror at the first mirror’s focus within the telescope body.
Tripod / Structural Support
High-power telescopes are large and challenging to operate with our hands, as we all know. So it must be mounted on sturdy structures to move horizontally and vertically. A computerized telescope is easy to move.
This telescope is highly efficient and straightforward to use. We use a tripod as structural support for some handheld telescopes.
Eyepiece
The eyepiece of a telescope is the section through which we can observe the individual subject. The eyepiece’s purpose is to expand the image we need to see. Telescope eyepieces are available in a variety of focal lengths. The lowest magnification eyepiece is about 24mm.
To compute the telescope’s magnification, we can use the proportion of the focal plane’s focal distance to the eyepiece lenses’ focal distance. Eyepieces are the most interesting part of a telescope. Hence, you’ll have a lovely time understanding eyepieces.
The thing that determines whether an eyepiece will be of a higher or lower magnification is the focal length. Hence, the shorter the focal length, the higher the magnification power.
To determine how much magnification an eyepiece will provide, use the following formula: Magnifying Power = Focal Height of Objective Lenses / Focal Length of Optical viewfinder Lens Focal Length of Objectives Lens / Focal Length of Eyepiece Lens.
To switch eyepieces, just change the existing eyepiece and insert another one.
Tube with Telescopic Extension
Any telescope with a primary mirror has a telescopic tube as its body. The telescope’s diameter is usually around 8 inches. You may improve its focal length simply by turning the knob.
Finderscope
A finderscope is a useful but not required component of a telescope. It’s nothing more than a little telescope linked to the body’s primary telescope. It has the same focal length as a telescope, and we aim it in the same direction.
A finderscope’s purpose is to determine the approximate location of an object or location wherein we must observe it. This finderscope has to have a large field of vision and a small magnitude. Many telescopes have a red dot finder scope.
How to Use a Telescope for Beginners?
What to Expect When Using a Telescope
Beware! This portion is a bit of a slam dunk!
As they have unrealistic expectations, several amateur astronomers give up before beginning. They believe backyard astronomy would be simpler since the telescope would be better. The vistas they will see will be as spectacular as those shown in astronomical periodicals.
While reality rarely meets expectations, astronomy can be a fun and rewarding hobby if the results match your expectations. As a result, the first section will assist you in setting reasonable expectations on how to use them and set up your entire telescope.
Astronomy Magazines Sell you a Lie!
If you’re like us, you were only drawn to astronomy either by
- Gazing up at the black night sky and also being awestruck by the glamour of a starry sky, so much so that you seemed to have to see more
- Seeing amazing images of nebulae, planets, and galaxy clusters in a telescope magazine made to have you purchase a goto telescope and have it for yourself.
Perhaps you first glanced up at the sky, became interested, and then purchased astronomy periodicals, where you saw the images that inspired you to buy a telescope.
The good news is that with a large scope and a dark enough night, you’ll be able to see spectacular views of the Moon, other planets, and even nebulae and galaxies.
The sad fact is that they won’t look anything like the magazine photographs you’ve seen. Instead, what you view through the eyepiece is a long cry from the images acquired by NASA during a planetary flyby, or by Hubble as seen from orbit, or even by a brilliant astrophotographer at your regional astronomy club.
Nothing will prepare us for the surprise, delight, and startled amazement you will have when you look through your telescope at Jupiter, Moo, or Saturn.
Backyard astronomy is not about stunning imagery. It’s the excitement of looking for a little star in the night and the astonishment you’ll experience once you view something trillions of kilometers beyond.
Your Telescope Will (Soon) Not be Good Enough
To be a backyard astronomer, a lifetime commitment to a larger aperture, finer eyepieces, and more expensive equipment are required.
Whether you spend $100 or $1,000 for your first telescope, you’ll be able to see some incredible vistas, as we’ll explain later. However, there’s a considerable possibility you’ll want to examine more details and start criticizing your scope’s restrictions.
When this happens, keep the following factors in mind:
- Most likely, your telescope is in good functioning order! Unless you use a very cheap telescope with just an aperture of fewer than 4 inches, you may see hundreds (if not thousands) of beautiful celestial deep sky objects. You will probably certainly not require a greater scope shortly.
- Because the lowest power eyepieces on your telescope are likely of poor quality, you probably only bought one or two. At least two or three types of Plössl eyepieces are recommended for optimal viewing. One for planets and moons, one for star nebulae and clusters, and a third for the dark sky and faint objects. You could find that a zoom eyepiece meets all of your needs in some cases in one go.
- Your telescopes come with an altazimuth or an equatorial mount that tracks the path of the stars across the sky. If you paid less money on your setup, the mount would likely be light and prone to vibrations. You can change the mount throughout time, but it’ll be pricey. Instead, use such free and reduced alternatives to reduce telescope vibration.
- We can’t compensate for poor visibility with all the aperture and best technology. You will notice fewer items if you live in a light-polluted area (check using this map). Someone you see will not shine as brightly or as clearly as they’re in the sky at night. Using a polarising filter will assist a little. However, studying astronomy in a darker environment will greatly improve your enjoyment.
Setting Up a Telescope Will Take Some Getting Used to
A cheap refractor on an altazimuth mount is the easiest telescope to set up. They’re as near to a point-and-shoot system as you’ll get. However, even a simple scope requires alignment before you can use it.
You’ll need to know a few more items to get as much out of the telescope. Click the buttons to open our’ how to’ guides in a new tab: Here’s our checklist of basic telescopic setup abilities you’ll need.
- Aligning a finderscope.
- Setting up an equatorial stand
- Collimating a primary mirror
- Setting up a Dobsonian telescope
- Polar alignment (equatorial mounts only)
- SkyAligning a Celestron (motorized tracking only)
Astronomy Can be Cold, So Dress Well to Survive
Telescopes are precisely tuned tools that magnify the heavens at very high magnification. As a result, they require a clear vision of the stars. Telescopes don’t perform well when aiming through the glass from within your house, and the heat trapped in a shed may turn the air cloudy and damage your vision.
There’s no way around it: if you become an astronomer, you have to go outside!
If we do not prepare adequately, we may experience cold and annoyance during seasonal periods of the year.
Dress appropriately (with thermals) for a cold night.
Remember that it will take your eyes almost half an hour to acclimate to the dark and provide you with the finest viewing experience.
It may take your telescope to readjust to the weather (especially if it’s a big one). So, set this up outdoors an hour before sunset to be prepared when the Sun sets.
Some Extras You’ll Surely Be Glad You Got
If you already have some basic materials on hand, you’ll be more likely to stick through your first few nights watching with a new telescope.
At the very least, we recommend:
- A planisphere for your location.
- Ideally, a red spotlight is put on the head to free up your hands.
- Astronomy software like Stellarium (free) or SkySafari 6 (paid)
- Sketchbook with pencil for taking notes
It’s also critical to have a strategy for what you want to see in the evening. If you aimlessly point your telescope around, frustration and boredom will rapidly set in if you aimlessly point your telescope around.
You can select targets using the program stated above or purchase an astronomy magazine, which frequently provides ideas for objects to seek out.
Getting to the “Using” Part
In astronomical circles, there’s a saying that goes, “The finest telescope is a one that we use!” It’s correct! A massive, expensive, and complicated telescope is useless if hidden behind a dust sheet in the corner of a basement.
We believe that seeing some amazing sights through your new telescope as soon as you set it up is the greatest way to ensure that you use it frequently. This section will show you how to get started quickly and experience your first beautiful views until moving on to more difficult subjects.
Observing The Moon
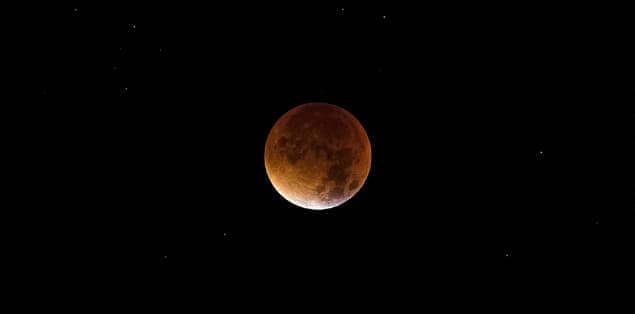
The Moon is the most visible celestial body at night and is the biggest and brightest object. If you’ve never viewed it via a telescope before, no matter how big your scope is, you’ll get blown away once you see it first! Allowing the nitty-gritty of telescope installation gets in the way of your pleasure is not a good idea!
Simply go outside the next moment our lunar friend is visible and focus your telescope in its direction.
Use the biggest eyepiece you have (for example, if your scope has 10mm and 20mm eyepieces, just use 20mm). We say this because it provides less magnification, allowing you to have more of the Moon inside one look.
Bring the characteristics into focus with your focusing knobs, and pay special attention to the section of the Moon’s surface in which light meets dark. It’s called the terminator because it’s where the shadows are the longest. Long shadows give craters relief, allowing us to perceive them in greater detail. You’ll be astounded by what you see the first time you do it.
Because the Moon travels so quickly through your eyepiece, you’ll need to utilize your telescope’s slow-motion controls’ to make it accompany it across the sky. It’ll be easier to accomplish if you have a polar-aligned equatorial mount, although it is simple enough.
After you’ve had your fill of the view, consider swapping out the eyepiece for just a smaller one to boost the magnification. It’s time to focus on the picture. Once you do, you’ll notice that less of the Moon is visible, but smaller features (i.e., more detail) on the Moon’s surfaces are now visible.
Time To Discover Your Debut Planet

The neighboring planets are the strongest entities in the night after the Moon.
Three of them are much easier to see than the rest:
- Venus
- Jupiter
- Saturn
Mercury and Mars are also visible using tiny telescopes; however, they are more challenging to observe. Mercury is constantly relatively close to the Sun, and Mars is often disappointing to inexperienced astronomers expecting to see it:
Instead, focus on seeing one of the three simplest and brightest planets. And, as your skills improve, these things will compel you to see more. To get the finest viewing this year, read our whole guide to the visible planets, and take in the sights of Saturn and Jupiter, which will wow anyone when they see them for the first time.
At least two of Jupiter’s major bands and four Galilean moons should be visible. With Saturn, you’ll be able to observe the planet’s famed rings, which are awe-inspiring! There are relatively few times until one of these three planets isn’t viewable during dark hours, so you’ll almost always be able to see them via your telescope.
Learn Your Way Around the Circumpolar Constellations
You’ll have to know how to look if you want to see something more difficult than Jupiter, such as a nebula, galaxy, or star cluster. Our solar system includes the Moon and planets, implying they are trying to move the distant stars.
Almost everything else you’ll like to see has a fixed place in the night sky, which means it follows the stars. Starting with the constellations, always seen in the sky at night, every evening of the year! It is one of the greatest ways to learn your way all-around the sky at night.
The circumpolar constellations are exactly what we call them – constellations. The number of circumpolar constellations varies based on how far northern or southern you are. However, most states in the US have at least six. They are as follows:
- Draco Cassiopeia
- Ursa Minor
- Cepheus Camelopardalis
- Ursa Major
The Little Dipper is the foremost important pattern to know since it contains the polar alignment star (Polaris).
Fortunately, Ursa Minor is indeed a simple constellation to recognize. Follow this up with Cassiopeia and Ursa Major, both easily visible, and orientating the night sky becomes a breeze.
Once you’ve mastered the circumpolar constellations, you may go onto more seasonal constellations like Cygnus (summer), Taurus (winter), and Orion (both winter). These are all simple to spot, even in light-polluted skies.
Look at the Star

Yes, this differs from the recommendation for seeing the moon part.
It’s crucial to learn the constellations so you can navigate the night sky with ease. However, this piece of advice is mainly about discovering new stars.
Some stars are particularly fascinating and serve as a good test of your telescope’s capabilities. For example, you could see stars of various hues and test how faint these stars you get are.
Splitting the double ones is the best challenge you can give yourself with stars!
You’ll find the double and binary stars identical on seeing through a scope, but they’re not. A binary occurs when two stars orbit one another. However, a double is when two stars appear close together from Earth but are rather far apart.
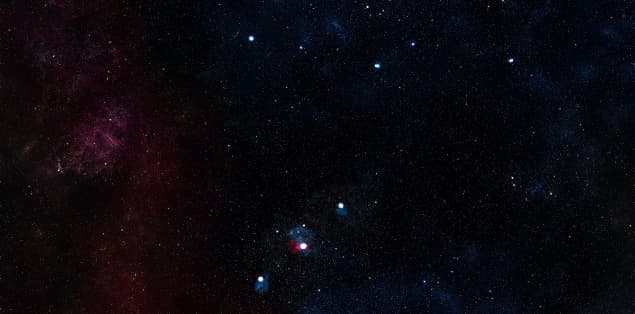
Discover the Beauty of the Messier Objects
Now that you’ve progressed through the gears, it’s time to look at your first Messier items.
The Messier catalog is a bundle of 110 items created by Charles Messier in the 1780s.
If you know to look at a dark place, you can see them all with the naked eye. But, of course, you’ll see more detail with your scope, but keep in mind that most of these things are far away and very dim.
You’ll see the famous ‘grey smudge’ for yourself — an astronomical term for dark space objects (DSOs) that accurately describes how many nebulae and galaxies appear through a telescope’s eyepiece.
The famous Andromeda Galaxy, for example, is easy to locate and observe. Because cameras are significantly more sensitive Because cameras are significantly more sensitive
The thrill of viewing a nebula or galaxy with your own eyes and marveling at their sheer vastness and distance and our location in the Universe is at the heart of backyard astronomy.
Because you cannot see all 110 Messier items simultaneously, you’ll have to pick the finest ones to pursue, depending on the season.
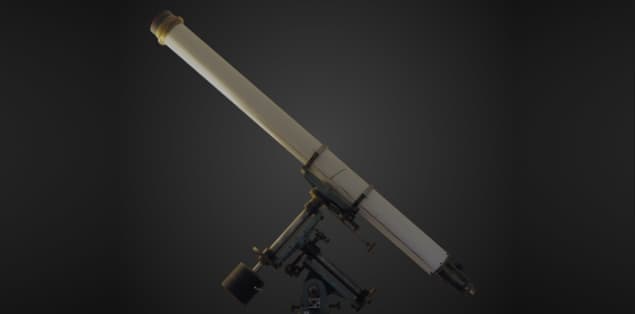
How to Use a Reflector Telescope?
The Universe is your oyster if you’ve got a reflector telescope. The methods for seeing the galaxy with a reflector telescope range from simple to complex, but getting started is surprisingly simple. The shift to more precise and intricate viewing should be reasonably easy once you’ve mastered casual exploring with your telescope.
- Gather all of your equipment and your telescope’s owner’s manual, and get to know your telescope. Most importantly, learn the names and functions of each eyepiece, knob, lock, and Barlow lens separately.
- Determine the eyepiece mount as well as try inserting and removing different eyepieces. Each telescope maker utilizes a slightly different form of lock to keep the eyepieces in position. So, if you’re not sure exactly your telescope’s lock mechanism works, consult its owner’s manual.
- Locate the finder scope that you will use to fine-tune your telescope before using it. Make a mental note of the positions of the bolts that should surround its detecting scope; these are all the bolts that you will use to align it.
- Study your star charts. It’s advisable to have them along when you go stargazing, but it won’t be simple to check them as it will be dark. You’ll need to utilize a portable light source, which will throw your eyes out of alignment with the darkness for a few moments, making it difficult to see anything through the telescope.
- You’ll like to refer to the charts as infrequently as possible once you’re out there in the field, so familiarity with them is essential. Put your telescope in a darkish, open clearing in which you may see the Moon. Look for a spot with no tall trees or other obstacles in your way, and seek the darkest spot possible.
- It can be difficult to see the stars properly if there is any detectable outside or ambient illumination. Disable the lens cap from the telescope and direct it to the sky. Place the eyepiece with the lowest magnification on the telescope mount and tilt the telescope until the Moon appears.
- Adjust the telescope angle, so the Moon appears in the middle of the sight frame. With the finder, examine the scope. Adjust the screws around the finder sight to align the crosshairs perfectly with the Moon inside the scope’s center. The telescope is now correctly aligned.
- At your leisure, explore the galaxy, referring to the startable if needed. Hold the telescope inset and switch to a high-power eyepiece when you want a closer look at something in your field of view.
How to Use an Astronomical Telescope?
Using an astronomical telescope is the same as using a normal one.
How to Use a Polaroid Telescope?
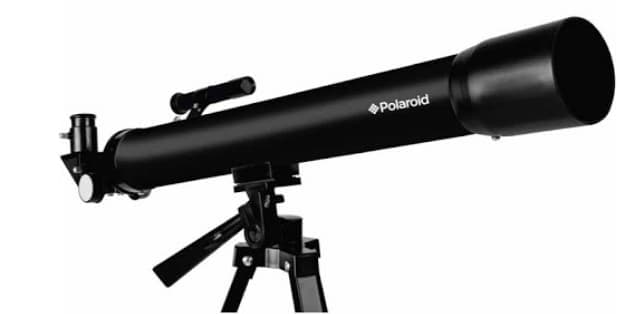
A Polaroid telescope is another name for a refractor telescope. Polaroid telescopes collect light from distant objects using glass lenses stacked in a metal cylinder. When combined with an adjustable magnifying ocular lens, a polaroid telescope allows you to explore these cosmic objects in exquisite detail. Compared to reflector telescopes, which employ mirrors rather than polarized glasses, polaroid telescopes provide high optical quality. Learn how to use it properly to reap the benefits of your polaroid telescope’s greater optical properties.
Follow the steps below to use a Polaroid telescope:
- Choose a location away from light elements to observe. Light pollution from street lights, porch lights, and other sources brightens the dark sky, leaving dim things challenging to see.
- You should place the tripod on the floor. Set the knobs on every tripod arm to lock it in position after extending each arm to the very same height. Raise the tripod to its full height. Release the tripod’s mounting area’s knobs. After inserting the telescope into the tripod’s mounting area, fasten the restraining bolts.
- Release the knobs upon the finder scope bracket of the instrument. Fasten the restraining bolt after inserting the finder sight into the bracket.
- Direct the telescope toward a celestial object. Like the Moon or a bright star, a bright object is a good choice. To aim the telescope in the proper vicinity of the object, adjust the optical tube and shift it from side to side.
- Examine the object with the finderscope. To center the subject in the finder scope, alter the telescope’s placement.
- Install a low-power eyepiece – with an optical zoom of 75X or less – into the telescope’s reticle. To hold it up, fasten the holding bolt. Validate whether the subject is really in the visual field by looking through the ocular. If this isn’t the case, use the finder scope to align the subject. Keep adjusting the focusing bolt until the item in the ocular lens seems clear. The lowest power eyepiece is about 24mm.
- To analyze the item in better detail, put a powerful ocular – one with a zoom of more than 75X – into the telescope’s reticle. Now, adjust the focusing knob to produce a clear image of the subject.
How to Use a Telescope to Find Stars in the Night Sky
One could use Starfinder software to locate the coordinates of a star at a certain time to find your star. As a result, this restricts the telescope’s search to a small region.
How to Use the Telescope to See the Moon?
Choose a moon map
You can see many magnificent features on the Moon with binoculars or even a small telescope.
You can simply examine its Moon and identify an amount of its most notable features using a lunar surface map and possibly a picture of a moon as a guide.
Manufacturers usually print a lunar map to represent the Moon because it appears to the naked eye or via binoculars: including its northern side up.
Be aware, however, that several astronomical telescopes offer an inverted (upside-down) or even reversed (mirror-image) perspective. Some telescopes can even perform both tasks.
Start turning the map upside down if your telescope shows the moon upside down, whereas your chart displays the moon right-side up. Use a telescope with an eyepiece that fits into the right-angle connection called a star diagonal on either hand. You’ll get a reversed view. In this circumstance, you’ll have to mentally rotate the Moon in the eyepiece right-to-left to resemble the Moon on paper.
The “Sky & Telescope Field Map of the Moon” is one of the most useful lunar maps (available in normal and mirror-reversed versions). The latter is primarily for users of refractors and Cassegrain scopes, which invert the picture of the Moon from left to right. This map is printed at a big enough scale to display great detail, but it’s folded in half to make it easier to use at the telescope. To prevent it from dew, manufacturers coat it with plastic.
See it Through a Telescope
A tiny telescope makes it simpler to observe the Moon’s craters and mountains. The standard rule of thumb for magnification is 50 times the aperture of the objective lens per inch of aperture. If you’re using a 2.4-inch refracting telescope, the greatest magnification you should utilize is 120.
The greatest magnification of a 4-inch reflecting telescope is 200 power. “Now wait a minute,” one might respond, “mine telescope arrived with a 350-power eyepiece.”
Final Words – How to Use a Telescope?
Telescopes are more of an eyeglass maker’s triumph than a scientist’s innovation. For example, we can see how crucial the opticians’ technology has become for astronomers presently. The Earth is not the center of the Universe, according to telescope studies, and multiple satellites plus their planets make up the Solar System. Manufacturers always improve the optics and develop new telescopes to provide better views.
High magnification generally results in a considerably weaker vision that will swiftly scintillate and wobble, much as a shooter can only magnify a picture up to a specific extent before the picture becomes blurry and indistinct. Keep in mind that you see into the cosmos through the glass of our sky, and larger power will merely amplify the instability, which is nearly always existent at elevated concentration.
We recommend utilizing only a half magnification of the full because such stormy air circumstances rarely enable you to utilize your optimum zoom. Use 60 strength if you own a 2.4-inch telescope and 100 strength if you possess a 4-inch telescope. Overall, you’ll probably get the best views.